
How to adjust camera shutter speed
When it is necessary to adjust your camera’s shutter speed:
When shooting fast-moving objects in video, adjusting the camera shutter speed is crucial to capturing motion accurately and achieving the desired visual effect. Here are some considerations for adjusting shutter speed when filming fast-moving subjects:
Freezing Fast Motion:
- If your goal is to freeze fast-moving objects and capture each frame sharply, use a faster shutter speed. A shutter speed significantly faster than the frame rate (e.g., 1/1000s or higher) can help freeze the action and reduce motion blur. This is commonly used in sports videography, wildlife filming, or any situation where you want to showcase quick movements with clarity.
Slow Motion:
- When shooting in slow motion, the shutter speed should be adjusted accordingly. If you’re capturing fast motion in slow motion (e.g., shooting at 120 fps), set the shutter speed to a corresponding value to maintain a natural motion blur for each frame.
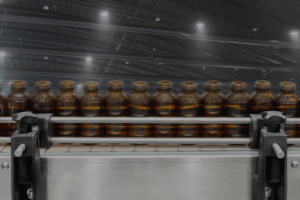
When looking at playback footage of your DVR, pause the video.
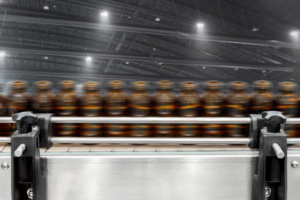

Does your image look blurry like the picture on the left? Or are the moving objects sharp like the picture on the right? If they are blurry, then you need to adjust shutter speed.
Navigating to the Camera Shutter Speed Menu:
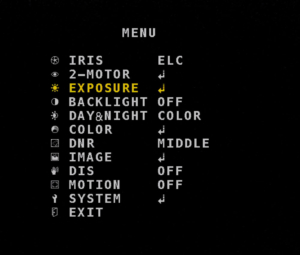
- In short, when in the OSD Menu:
- Menu > Exposure > Shutter: Manual > Adjust Speed:
- Long version:
- Go in to the camera OSD Menu, move down to exposure and hit enter/return/menu button.
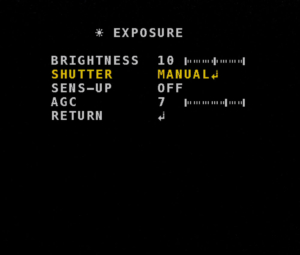
-
- Next go to shutter, change “auto” to “manual” and press enter.
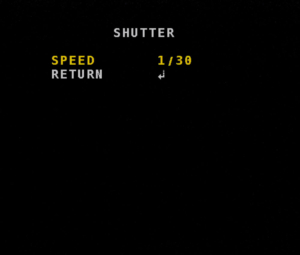
-
- Here is where you will adjust shutter speed. Depending on camera model, 1/30 might be the lowest you can go (60fps model), and 1/240 will be the lowest you can go (240fps model camera).
Adjusting shutter speed for a sharper image.
First, it is best to adjust this setting while your production line is moving, you will need the objects actively moving to see if the new setting is making the image better. This kind of adjustment can be seen immediately.
Now that you are on the Shutter Menu, the best way to test which setting is best is to slowly scroll through the different speed settings, sitting at each setting for a few seconds and then moving on to the next setting.
Scrolling through shutter settings:
- With objects moving in the image, change your shutter speed like so: 1/30, 1/60, 1/120, 1/250, etc. keep changing once, and pausing for several seconds while letting objects pass through the image, then on to the next setting.
- You can review the playback on the DVR of you scrolling through the settings and look at the moving objects to see if they get blurry, or sharp. One thing you will notice is that the faster shutter speed you change too, the darker the image gets on the video. This is because there is less time for light to enter the camera while the shutter is opening and closing, therefore we provide high intensity LED lighting for high speed cameras to allow more light into the camera sensor to produce a more clear video.
- After going through all the settings, you note which setting looks best and go back to the camera and set up for that setting. Our goal is to make the image below, progressively into a sharper image:

In general, the image on the left is default shutter speed around 1/60 to 1/240. The image on the right will be shutter speed closer to 1/2000.
Now you may start adjusting the shutter speed and your image may be too dark, or start producing too much noise/distortion the more you raise your shutter speed, so your image might start to look like this:
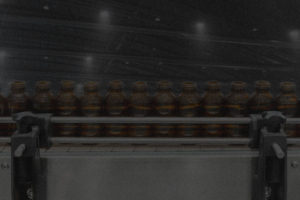
If your image is too dark like the images above, that means that there is not enough light for the camera to adjust shutter speed. Either the area itself is too dark in general, the moving objects you are trying to capture are too dark, or you have not yet setup the high speed LED lighting provided with the high speed kit.
Setting up High Speed Lighting
Once you setup high speed lighting, point it at the moving objects you are trying to capture, and avoid any odd LED angles that might reflect directly back into the camera. After setup, you should be able to raise shutter speed and will see results like the images below:
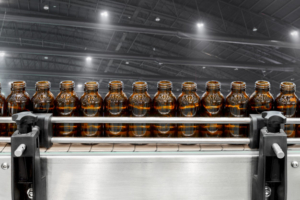
With the LED setup, you should notice the noise/distortion go away as you shine the LED on your capture area.
Colored Ghosting Images
- There are certain situations where you have setup all the LED lighting and shutter speeds to the correct settings, and the image is definitely sharper, but when pausing the image, you may see a different type of “ghosting” on only the moving objects, almost a double image vs regular blurring.
- This kind of ghosting is caused by DNR (Digital Noise Reduction) Feature on the Main Menu of the Camera OSD menu, this feature 99% of the time will smooth out all noise and pixels for your camera video. But if objects are of certain color reflection and move fast enough, it may just be too fast for the DNR feature to work correctly. So turning DNR off is one option to see if it improves the quality of your image of the moving objects.